Basic Attestation Request#
This tutorial shows basic use of the State Connector protocol.
In this tutorial, you will learn how to:
- Make a query to the State Connector smart contract.
- Get the result from an attestation provider.
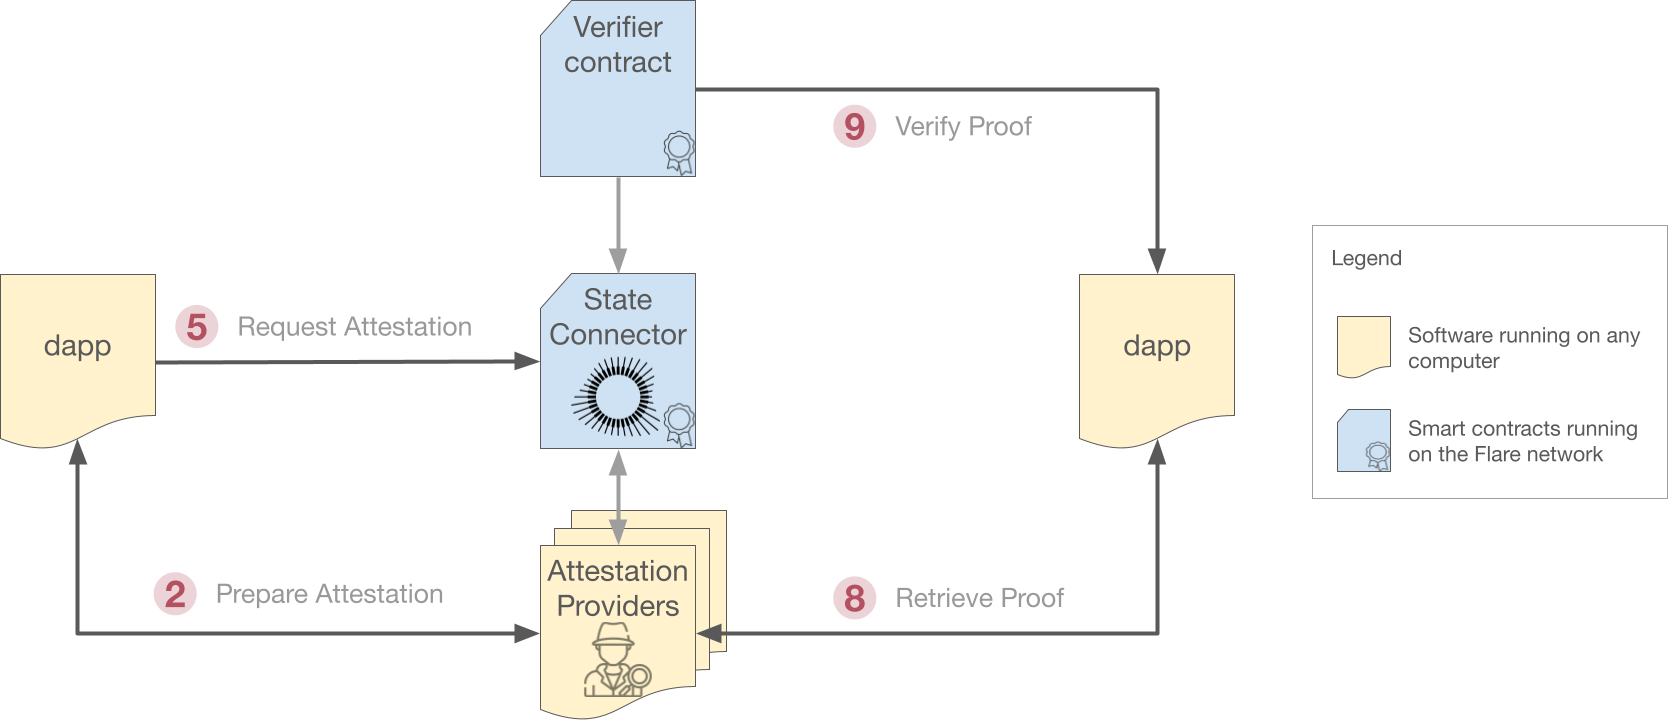
- Use a smart contract to verify that the result returned by the attestation provider matches the result agreed upon by the State Connector.
The diagram below shows the process that this tutorial follows. Arrows that match one of the steps in the tutorial are numbered.
Code#
For easy navigation, numbered comments in the source code (as in // 1.) link to the tutorial sections below.
| AddressValidity.js | |
|---|---|
1 2 3 4 5 6 7 8 9 10 11 12 13 14 15 16 17 18 19 20 21 22 23 24 25 26 27 28 29 30 31 32 33 34 35 36 37 38 39 40 41 42 43 44 45 46 47 48 49 50 51 52 53 54 55 56 57 58 59 60 61 62 63 64 65 66 67 68 69 70 71 72 73 74 75 76 77 78 79 80 81 82 83 84 85 86 87 88 89 90 91 92 93 94 95 96 97 98 99 100 101 102 103 104 105 106 107 108 109 110 111 112 113 114 115 116 117 118 119 120 121 122 123 124 125 126 127 128 129 130 131 132 133 134 135 136 137 138 139 140 141 142 143 144 145 146 147 148 149 150 151 152 153 154 155 156 157 158 159 160 161 162 163 164 165 166 167 168 169 170 171 172 173 174 175 176 | |
Run with Node.js
This tutorial has been tested with npm v9.5 and Node.js v18.16.
- Create a new folder and move into it.
- Copy & paste the code above into a new file called
AddressValidity.js. - Initialize project and install dependencies with:
npm init npm install ethers@6.3 @flarenetwork/flare-periphery-contract-artifacts@0.1.7 - Run the program with:
node AddressValidity.js
Tutorial#
1. Set up#
The tutorial uses the following dependencies:
-
The Flare periphery artifacts package, which provides the API for all Flare smart contracts.
-
The ethers package, which is also needed to work with smart contracts.
22 23 24 25 26 | |
The periphery package significantly simplifies working with the Flare smart contracts. If you remove this dependency, you must manually provide the signatures for all the methods you want to use.
This tutorial needs to send transactions on the Coston test network, so you will need an account with enough $CFLR tokens to pay for gas.
The Getting Started guides explain how to configure your wallet and get test tokens from the faucet.
Warning
For simplicity, this tutorial hard-codes the private key of the wallet being used in the PRIVATE_KEY variable.
10 11 | |
In a production setting, the private key should be retrieved from an external source (such as a .env file) and NOT embedded directly in the code.
2. Prepare Attestation Request#
Requests to the State Connector must be extremely specific. For example, to request a proof that a given transaction exists, the transaction ID alone is not enough. The block number and block timestamp where the transaction was included must also be provided. Furthermore, requests must be encoded into a hex string before being submitted to the State Connector.
You can perform all these operations yourself, but, as a convenience, attestation providers can prepare requests for you, filling in all missing information and taking care of formatting.
The attestation type chosen for this tutorial, AddressValidity, is the simplest one and requires only the address to be validated.
However, it is still a good example of the process.
To prepare a request using an Attestation Provider, begin with a raw attestation request:
31 32 33 34 35 36 37 38 | |
The raw attestation request contains:
attestationType: A unique identifier for the type of attestation you want, which is just an encoded version of its name. See the list of the currently available attestation types.sourceId: The network on which you want to make the request. Available networks depend on the attestation type and are listed in the documentation of each one. This example uses the Coston test network, so network names are prepended withtest.requestBody: A JSON object specific to each attestation type. In this example, it is just the address that you want to validate.
Then obtain an encoded attestation request:
46 47 48 49 50 51 52 53 54 | |
This code performs a POST request to the prepareRequest endpoint of the attestation provider, using the standard fetch API.
ATTESTATION_PROVIDER_API_KEY is the API key of the chosen attestation provider, if it needs one.
Attestation providers are typically paid services and require an API key to operate.
Finally, encodedAttestationRequest is the returned encoded request ready to be submitted to the State Connector.
3. Access Contract Registry#
The FlareContractRegistry contains the current addresses for all Flare smart contracts, and it is the only recommended way to retrieve them.
Its address is the same on all of Flare's networks, and it is the only Flare address that needs to be hard-coded into any program.
5 6 | |
65 66 67 68 69 | |
Note that this tutorial uses the Coston test network here rather than the main Flare Network.
4. Retrieve the State Connector Contract Address#
Retrieve the State Connector's address from the FlareContractRegistry.
72 73 74 75 76 77 78 | |
Use the getContractAddressByName() method from the FlareContractRegistry smart contract to retrieve the address of the StateConnector smart contract.
5. Request Attestation from the State Connector Contract#
Now, request an attestation from the State Connector contract by sending the encoded attestation request from step 2.
Use the requestAttestations() method from the StateConnector smart contract.
82 83 84 85 86 | |
attestationTx contains the TransactionResponse.
After you wait on it and the transaction is added to the blockchain, you obtain a TransactionReceipt.
From this receipt you finally retrieve the block that includes the request transaction.
This block is needed in the next step.
6. Calculate Round ID#
In order to recover the attestation result when it becomes available, you will need the round ID where the request was submitted. This is calculated from the block timestamp:
89 90 91 92 93 | |
Attestation rounds last roundDuration seconds, starting roundOffset seconds after the Unix epoch.
You will use submissionRoundID later.
Tip
To optimize performance, consider caching the roundOffset and roundDuration values instead of retrieving them from the blockchain every time.
7. Wait for the Attestation Round to Finalize#
You need to wait for the attestation round to finalize, because results are only available after finalization.
98 99 100 101 102 103 104 105 106 107 108 109 110 | |
Attestation rounds use the Collect-Choose-Commit-Reveal (CCCR) protocol, which requires 270 - 360 seconds, depending on attestation provider's submissions, and the point inside the Collect phase in which the request was submitted.
For this reason, this tutorial polls the State Connector's last finalized round (StateConnector.lastFinalizedRoundID) every 10 seconds so that results are obtained as soon as they are available.
Polling vs Waiting
Polling every 10 seconds is a good tradeoff to minimize the waiting time, but you can choose to always wait the maximum amount of time (360s), or even wait the minimum amount (270s), and then poll.
Proof Accessibility Window
Proofs are kept on-chain for just a week. After this period, the proofs will no longer be accessible, so timely verification is crucial.
8. Retrieve Proof#
It is time now to fetch from the attestation provider the result for the round ID where the request was submitted (submissionRoundID).
The result is a Merkle root, which is the root of a Merkle tree. This tree has been constructed with the hashes of all the requests received during that round that were considered valid by a majority of attestation providers.
If your request was valid, i.e., if the provided address was a valid Bitcoin address, then its hash will be part of the received Merkle root.
113 114 115 116 117 118 119 120 121 122 123 124 125 126 127 | |
You need to construct a proofRequest and make a POST request to the get-specific-proof endpoint of the attestation provider.
Doing so returns, among other things, a Merkle proof consisting of one or more nodes (hashes). If the Merkle tree is rebuilt using these nodes plus the hash of your request, and the resulting root hash matches the agreed-upon value stored in the State Connector, it means that the proof can be trusted.
You can perform these operations yourself or you can use a verifier smart contract, as shown in the next step.
The received proof already contains a field, proof.data.responseBody.isValid, which indicates whether this particular attestation provider believes the queried address to be valid or not.
But this result cannot be trusted until you verify that it matches what the rest of attestation providers submitted, as explained next.
9. Send Proof to Verifier Contract#
Send the proof to the AddressValidityVerification smart contract.
This smart contract verifies the request by rebuilding the Merkle root using the hashes contained in the proof.data.merkleProof object and comparing it to the Merkle root stored in the State Connector.
136 137 138 139 140 141 142 143 144 145 146 147 148 149 150 151 152 153 154 155 | |
isVerified contains the result of the verification, analyzed next.
Note
This tutorial uses a verification contract provided by Flare, but dapps can embed the same logic into their own smart contracts if they wish to.
10. Check if the Address is Valid#
Finally, check if the address is valid or invalid according to the attestation providers, but only if the attestation has been verified.
isVerified indicates whether the attestation you received from the attestation provider matches what the majority of them agreed upon.
If the value is false, you do not need to look further because the attestation provider is probably lying and its results cannot be trusted.
In this case, you need to make the request again, ideally through a different provider.
If isVerified is true, then you can look at the actual result of your request in the isValid field of fullProof.data.responseBody obtained in step 8.
If this value is true too, then the queried address is valid.
159 160 161 162 163 164 165 166 167 168 169 | |
Conclusion#
This tutorial has shown how to:
- Prepare a State Connector request using the
prepareRequestREST endpoint of an attestation provider. - Make a request to the State Connector smart contract using
requestAttestations(). - Get the result from an attestation provider by making a
POSTrequest to theget-specific-proofREST endpoint. - Use the
AddressValidityVerificationsmart contract to verify that the result returned by the attestation provider matches the result agreed upon by the State Connector.
Next Steps#
The State Connector can be used for a host of other things beyond just verifying address correctness. The attestation type of the request selects the type of information you want.
33 | |
Other attestation types include:
- Payment: Verifies whether a payment transaction occurred in which funds were sent from one address to another address.
- Balance-decreasing transaction: Verifies whether a transaction that might have decreased a balance occurred.
- Referenced payment nonexistence: Verifies whether an account did not receive funds from a different account by a specific deadline.
- Confirmed block height: Verifies whether a block on a certain height exists and was confirmed.
More attestation types are to be added in the future, subject to community approval and support.
Also, recall that the AddressValidity attestation type used in this tutorial is the simplest one to use as it does not require accessing any connected networks.
Other attestation types do, however, and so they tend to be more complex to use.
See the state connector attestation types for more information on other attestation types.