Using FlareStake to Stake#
FlareStake is a graphical user interface (GUI) that enables you to easily stake your funds to validators and earn rewards.
Staking works by locking funds for a period of time to support a specific network validator. When validator owners stake to their own nodes they self-bond, whereas all other participants are said to delegate their stake to that validator. Note that delegating your stake to a validator is different from FTSO delegation.
Note
Proof of stake is being implemented on Flare in phases. Ensure that you have read the Validators page to learn about them.
Participants choose how much to stake and for how long their stake will be locked. The minimum values are:
| Self-bond | Delegation | |
|---|---|---|
| Minimum amount | 1M $FLR |
50K $FLR |
| Minimum duration | 60 days | 14 days |
At the end of every reward epoch, participants are rewarded according to how well their chosen validator performed in that period.
Staking limits
When you choose your validator and amount to stake, consider the delegation factor and the staking cap.
You can stake to any number of validators, but rewards, FlareDrops, and governance vote power only apply for up to 3 different validators.
The deployment phases summary shows other rewards that staked funds can still earn while they are locked.
Given that the Flare network uses two independent underlying chains, there is one extra step that must be considered. Funds must be transferred from the C-chain, where smart contracts run, to the P-chain, where staking happens. After the staking period expires and funds are unlocked, they can be transferred back to the C-chain.
This guide explains how to stake Flare assets by using FlareStake, the GUI tool for staking. Another tool exists which uses the command line exclusively. See the Using the CLI to Stake guide to learn about it.
Prerequisites#
- A Ledger hardware wallet set up to manage Flare assets.
- Knowledge of the available validators to which you want to delegate your funds. Obtain a list of current validators from any of the tools listed in the Staking page.
Accessing Your Wallet#
- Open FlareStake.
- Click Access Wallet.
-
Click Ledger.
Make sure your Ledger device is plugged in, it is unlocked with your PIN, and the Avalanche app is running.
Installing the Avalanche application
- Connect the device to your computer and unlock it using your PIN code.
- Open the Ledger Live application. Go to the My Ledger tab and make sure the device is using the latest firmware.
-
In the App catalog tab, search for "Avalanche" and click on the Install button.
Version should be at least v0.6.5.
Note that this app requires all available space on a Ledger Nano S device (138 KB). You might need to remove other apps first to free up space.
-
Exit the Ledger Live application and make sure the device is not connected to any other application like MetaMask.
-
Click the top dropdown menu to select whether the account containing the funds you want to stake was created using Ledger Live or some other wallet like MetaMask.
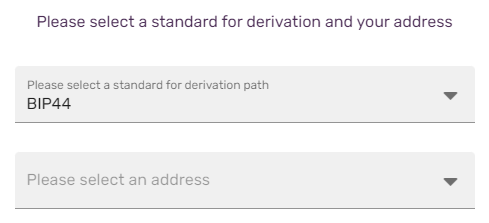
Address selection dialog. Derivation Paths
A single hardware wallet can generate an unlimited number of addresses by using a derivation path. By using the same derivation path, multiple wallets like MetaMask or Bifrost can retrieve the same addresses from a hardware wallet.
You need to tell FlareStake the derivation path that was used to obtain the address containing the funds you want to stake. Fortunately, there are only two common paths:
- Ledger Live: If you created your account from the Ledger Live tool.
- BIPS-44: If you used almost any other wallet.
-
Click the bottom dropdown menu, and select the address you want to use from the list.
The first time it takes a few seconds to obtain the list of addresses from the device.
-
Click Access Wallet. The FlareStake dashboard is displayed.
You can now continue to the Staking Guide or the Reward Claiming Guide.
Staking Guide#
1. Binding Your Addresses#
To receive your staking rewards, you must bind your P-chain address to your C-chain address.
This procedure only needs to be done once per P-chain address. See the command-line version of this guide for more information.
-
On the FlareStake dashboard, click
 Staking.
 -
In the Bind Your Addresses section, click Register.
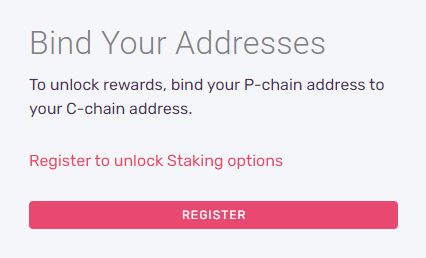
Address binding menu. The Bind Your Addresses window is displayed.
-
Click Bind Address.
-
Confirm the action on your Ledger.
Your P-chain address and your C-chain address are now bound to each other.
2. Move Funds to the P-Chain#
To stake, your P-chain address must contain at least 50.000 native $FLR tokens.
If your P-chain address is already properly funded, skip this step.
Keep in mind that wrapped $WFLR tokens must be unwrapped before they can be transferred to the P-chain.
- On the FlareStake dashboard, click
 Cross Chain.
 - Ensure the Source Chain field says C-chain and the Destination Chain field says P-chain.
- In the Amount field, specify the amount of
$FLRto send to your P-chain address. - Click Confirm.
- Click Transfer.
-
Confirm the action on your Ledger.
Transfers between chains are made of two operations: an export from the C-chain followed by an import to the P-chain. Therefore, you are asked to confirm TWO transactions on your hardware wallet.
Transaction Caveats
- When transferring from the C-chain to the P-chain, transaction fees are wholly paid from the C-chain. Make sure you leave enough funds on the C-chain after the transfer, or it will fail.
-
Sometimes, when you transfer funds between the chains, your funds seem to disappear. Rest assured that your funds are not lost. You just need to repeat the import operation. If your funds are not visible on FlareStake, complete these steps:
- On the FlareStake dashboard, click Advanced.
- In the Chain Import section, click the appropriate Import button, depending on the chain from which you imported. For example, if you're moving funds from the C-chain to the P-chain, click Import P (From C).
The amount of funds you specified in step 3 is now at your P-chain address.
3. Stake Your Funds#
To stake funds, delegate them to an existing validator.
- On the FlareStake dashboard, click Staking.
-
In the Add a Delegation section, click Add Delegation.
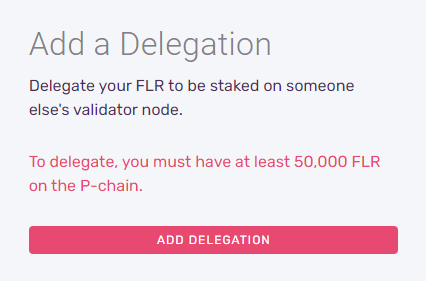
Add a delegation menu. The Delegate window is displayed.
-
In the Node ID column, locate the ID for the validator to which you want to delegate your staking funds.
-
To select the validator, click Select. Information about the validator is displayed.
-
In the Staking End Date field, specify the date and time when you want to stop staking your funds. If you specify a date and time that occurs after the validator's self-bond has ended, your transaction on the P-chain will revert.
-
In the Staking Amount field, specify the amount of
$FLRyou want to delegate to stake. -
Click Confirm. The staking information you specified is displayed.
-
Review the staking information. If it is correct, click Submit to begin your delegation. Otherwise, click Cancel.
-
Confirm the action on your Ledger.
Your stake is now locked and will start accruing rewards immediately. When the selected end time arrives, the funds will be automatically unlocked.
Reward Claiming Guide#
At the end of every reward epoch, participants are rewarded according to how well their chosen validator performed in that period, but these rewards are not claimable yet.
Every 4 reward epochs, rewards are accumulated in a dedicated smart contract and can then be claimed from the FlareStake tool:
-
On the FlareStake dashboard, click
Staking. -
In the Manage Rewards section, click Manage Rewards.

Manage rewards menu. Information about your rewards is displayed.
-
In the Rewards to claim field, specify all or part of your unclaimed rewards.
- Optional: To send your rewards to a different wallet, click Another Wallet, and specify the address in the C-Chain Address field.
- Click Claim Rewards.
- Confirm the action on your Ledger.
Your rewards are claimed and added to your available balance.